I am Eason. I am back in my workshop today, and my hands are covered in a bit of grease. It reminds me of my recent trip to Hainan Island. I took my wife and two sons on a cycling tour around the entire island—over 1000 kilometers of wind, sun, and steep hills. On that journey, I realized that if a tiny bit of sand gets into your bike’s derailleur and you don’t clean it properly, the whole machine becomes inefficient. An LED silicone strip extrusion machine is no different. The mold set is the “gears” of your production.
If you do not know how to disassemble and clean it correctly, even the best hardware won’t save your quality. You will get rough surfaces on your 1615 or 1212 neon flex, or worse, “color bleeding” in 3-color strips. Today, based on the technical video I’ve shared, I will walk you through the professional way to open your mold. In 2026, precision is profit. If your team follows these steps, your machine will last longer, and your scrap rate will stay near zero.
1. Preparation: The “Hainan Cycling” Level of Readiness
Before you touch the bolts, you must prepare. As I learned in Hainan, you don’t start a long ride without checking your tires. In the factory, you don’t start disassembly without the right environment.
- Tool Quality: Use only high-grade Allen keys. For S136 stainless steel molds, a stripped bolt is an expensive disaster.
- Clean Zone: Have a dedicated, dust-free table ready to hold the precision components.
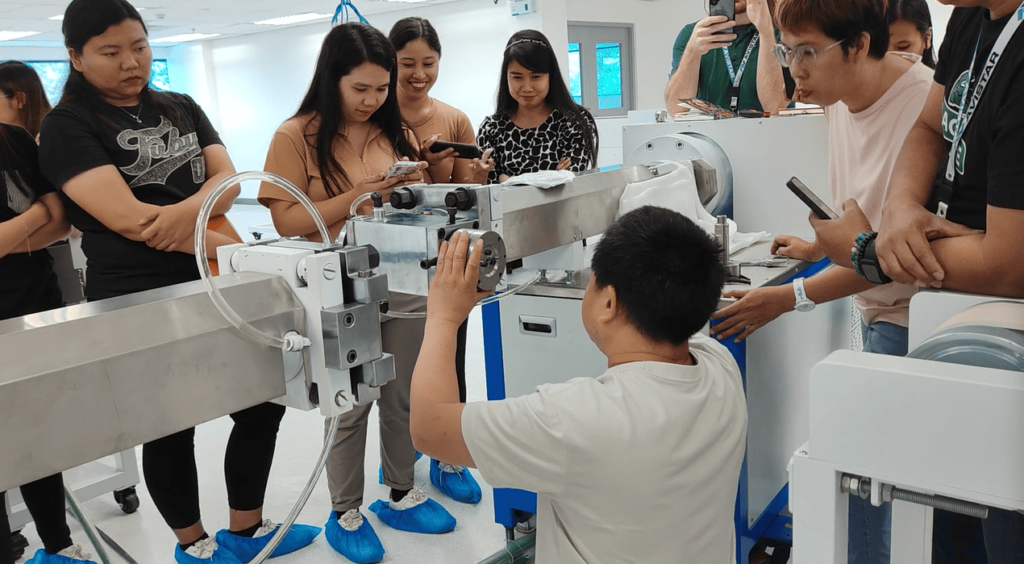
2. Step-by-Step Disassembly: From Exterior to Core
Following the video I provided, let’s break down the process into four critical phases:
Phase 1: Loosening the Rear Bolts [00:00:25]
First, we must remove the TWO main mounting rear bolts. The video shows the operator following the “Diagonal Rule”—loosening each bolt a little bit at a time in a cross pattern. This prevents the mold plates from warping due to uneven pressure. A slightly side push can destroy the core mold tip.Carefully take out the core mold base.
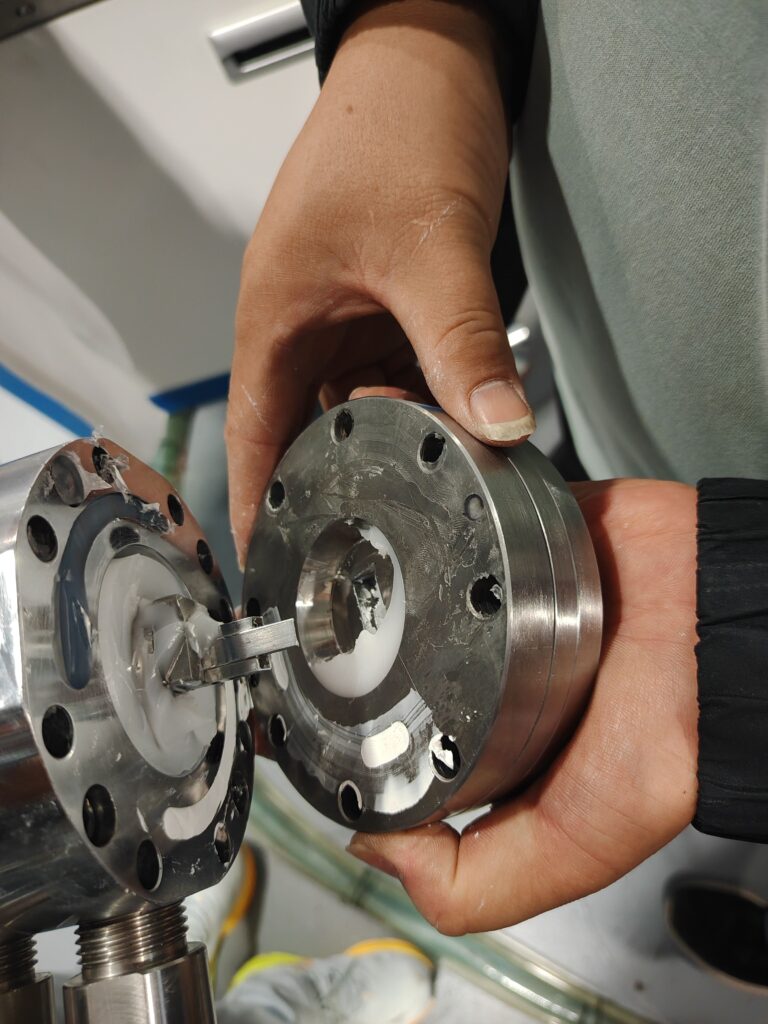
Phase 2: Separating the Shell and Flow Plates [01:15:30]
Once the bolts are out, you need to separate the plates. Never use a steel hammer. The video shows the use of a copper or plastic pry bar. We are exposing the “Flow Channels” where the white reflective silicone and the clear top silicone meet. Keeping these channels polished is the secret to a sharp light-cutoff line in your neon flex.
Phase 3: Removing the Core Pin [02:10:00]
This is the most delicate part. The core pin creates the hollow space inside your 1212 or 1615 profile. In the video, you see the operator pushing the pin out from the back. Never pull it from the front with pliers. The tip of the core pin is precision-ground. If you scratch it, every meter of light you produce will have a visible line inside. It is the “heart” of the mold.
Phase 4: Disassembling the PCB Guide Slot [03:20:15]
Finally, for those using automatic LED feeding, you must remove the guide slot. This ensures the LED PCB stays perfectly centered. The video demonstrates how to place these small parts into an ultrasonic cleaner immediately. This removes the “dead” silicone that causes jams.
3. Maintenance Checklist: 2026 Factory Standards
To ensure your workers do not make mistakes, I have created this standard operating procedure (SOP) table.
| Step | Action | Danger (Prohibited) | Result of Error |
|---|---|---|---|
| Surface Prep | Use copper brushes for residue | Using sandpaper or steel brushes | Scratched mold surface/leaks |
| Bolt Removal | Diagonal sequence | Sequential removal | Warped plates/loss of precision |
| Core Removal | Push at constant speed | Twisting or prying | Bent core pin/uneven wall thickness |
| Cleaning | Cotton cloth + specialized solvent | Using sharp knives to scrape | Flow marks/shadows in the light |
4. Why “Cleaning” is More Important than “Taking it Apart”
At the end of the video [04:45:10], you see all the parts laid out cleanly. This is not for show; it is for inspection.
I want to dive deeper into the logic of Flow Channel Polishing. Silicone can “char” if left at high temperatures too long. If you don’t clean the corners of the mold perfectly, these tiny black specks will end up in your next batch. In projects in Europe or Saudi Arabia, a single black speck in a 5-meter strip means a return. When I was cycling in Hainan, I checked my brakes every morning. If there was one small stone, it could ruin the rim. In your factory, a 0.1mm piece of burnt silicone can ruin 8,000 meters of output. That is why we use ultrasonic cleaning and mirror-polishing on the S136 steel.
5. Maintenance and Calibration Frequency
| Level | Frequency | Core Action |
|---|---|---|
| Routine | Every Shift Change | External wipe-down; check for nozzle leaks. |
| Deep Clean | Weekly / Material Change | Full Disassembly (as per video); ultrasonic cleaning. |
| Calibration | Quarterly | Check core pin concentricity with a CMM. |
| Refurbish | Every 6 Months | Professional mirror polishing of all flow paths. |
Conclusion: Mastering the Mold, Mastering the Profit
In conclusion, knowing how to disassemble your LED silicone extrusion mold correctly is a fundamental skill for 2026. As you can see in the video at [02:30:45], every movement must be intentional. Do not rush this process to save 30 minutes. A mistake here can cost you a week of downtime and thousands of dollars in wasted silicone.
I am Eason, and I don’t just sell you an LED silicone strip extrusion machine; I provide you with the discipline of professional production. During my 14-day on-site training, I will personally show your team how to handle these molds with the care they deserve. Just like I guided my sons through the hills of Hainan, I will guide your factory to reach peak performance. Let’s make sure your 1615 and 1212 profiles are perfect every time. Contact me today if you have questions about your mold setup, and let’s get your production line running with 100% precision.
Keywords: LED silicone strip extrusion machine, mold disassembly, silicone extrusion maintenance, 1615 neon flex production, S136 mold steel, ultrasonic cleaning for molds, Eason sales engineer, extrusion hardware, factory SOP 2026.
- Hiring the Perfect Extrusion Engineer in 2026: A Blueprint for Your LED Silicone Production Line
- Mastering the Factory Acceptance Test: A Live Guide to Silicone LED Strip Machine Commissioning
- Zero Waste Strategy: How to Reuse Tail Materials in Silicone LED Strip Extrusion
- Passing the Torch: Teaching Silicone LED Strip Extrusion Training to the Next Generation
- Global Crisis: How the Iran Conflict is Reshaping Silicone LED Strip Production Costs